1. Overview
1.1. Purpose
This idea is addressed by Simon and I during discussion. And we found Andriod open source community is using this way for a long time. So I’d like mark my practice notes here.
- Gerrit is
git repository management tools, more external reference you can read about the benefits of git
- Gerrit provides good source code review web UI
- Gerrit is easier to integrate with jenkins
So, from developer perspective of view, he/she can focus on source code changing/implementation, no more interruption from process manager or quality manager. From process manager view, he/she can define the source code commit and review process easier via gerrit configuration. From quality manager view, he/she can easier get the source code and review quality metrics which via developed metrics system (cooperate with jenkins and gerrit through REST query API).
Of cause, if your organization still using subversion, you can use subgit to sync the changes between subversion and gerrit.
1.2. Architecture
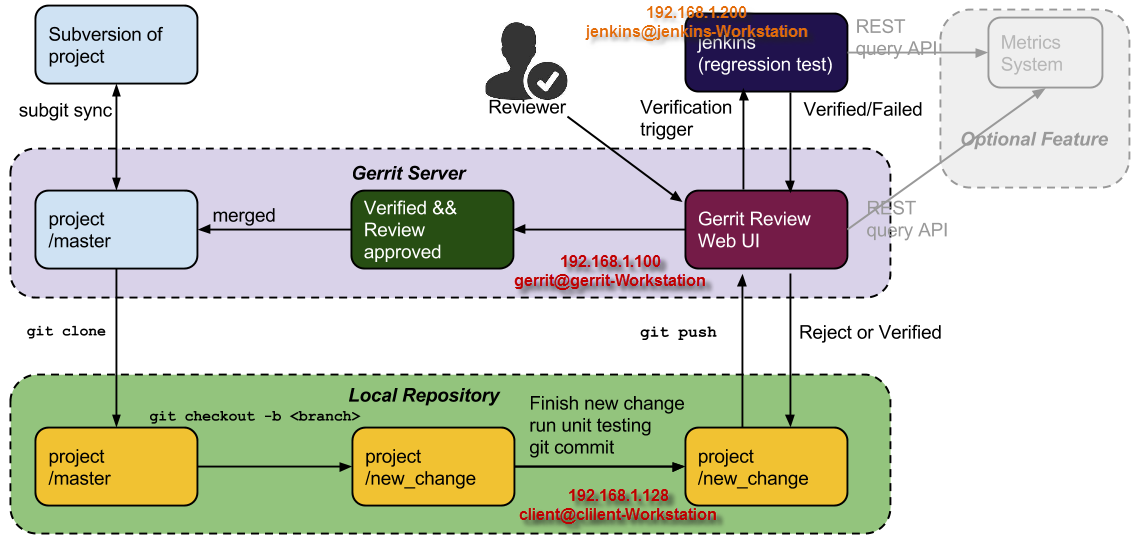
Team can use subgit mirror the project to team owned gerrit server, and then team member clone the project to their local disk. Any changes making will be happen in local repository, after changes done. Developer can push the changes to remote repository (i.e., the gerrit server git repository). Once the changes is pushed to the server, gerrit will trigger jenkins to verify the changes (Compiling, unit testing, regression testing etc. CI jobs will be ran), and meanwhile, gerrit will send the review request mail to dedicated reviewer. After the reviewer approved the changes and jenkins verified okay, the source code changes can be merged into project master which is located in gerrit git repository. Otherwise, developer shall rework and push new patch again.
2. Gerrit Deployment
2.1. Installation
gerrit@gerrit-Workstation:~/gerrit$ java -jar gerrit-2.6.1.war init -d review_site
Once finish the installation of gerrit, it will be started automatically, or you can switch to $(ROOT)/bin folder, and execute command
gerrit@gerrit-Workstation:~/gerrit/review_site/bin$ ./gerrit.sh start
Starting Gerrit Code Review: OK
to start it.
2.2. LDAP Configuration
To support the LDAP authentication, you have to change the gerrit configuration under $(ROOT)/etc/gerrit.config, so that, you can use the LDAP type to authenticate the gerrit login and git operates.
[auth]
        type = LDAP
        gitBasicAuth = true  #This option means user can push source via ldap authentication during execute git related comments.
[ldap]
        server = ldap://ldap-server-address:389 #fill yours
        username = cn=BOOTMAN_Acc,ou=SystemUsers,ou=Accounts,o=... #fill yours
        accountBase = ou=People,o=xxx #fill yours
        accountPattern = (uid=${username})
2.3. Create a new project
Login the gerrit web UI
Type the http address of gerrit service on browser, in this case, it’s http://192.168.1.100:8081/, sign in with your account which stored in the ldap.
Create new project
Create new project, and “Rights Inherit From” shall be “All-Projects”, it means current you created project configuration(such as access control) will inherit from “All-Projects” project, of cause, you can select inherit from empty, or define your project owned properties by yourself.
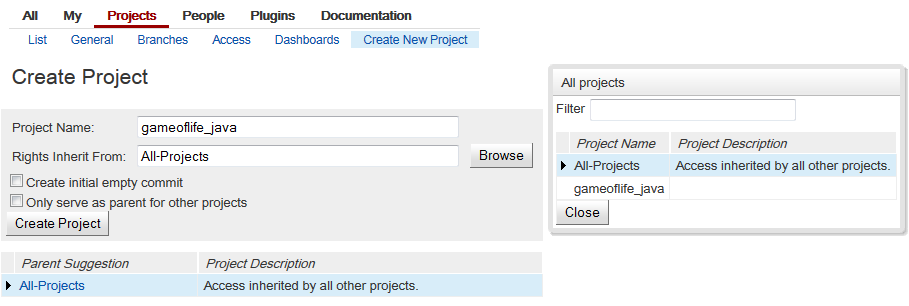 Figure 1-1
After create this project, it means create a new project git repository under gerrit git repositories folder. In this case, the new project git repository is http://192.168.1.100:8081/gameoflife_java. You can clone this project in your local PC by execute this command.
client@client-Workstation:~/workspace$ git clone http://192.168.1.100:8081/gameoflife_java
Cloning into 'gameoflife_java'...
warning: You appear to have cloned an empty repository.
Now you have cloned the repository, because this repository is empty, so there is warning prompted.
client@client-Workstation:~/workspace/gameoflife_java$ git remote -v
origin  http://192.168.1.100:8081/gameoflife_java (fetch)
origin  http://192.168.1.100:8081/gameoflife_java (push)
2.4. Client works
As developer, the most of works are done in client site, since your local git repository will cooperate with remote gerrit git repository, we have to do some initial step firstly.
Get the commit-msg which is used for generate the changed-id:
client@client-Workstation:~/workspace$ cd gameoflife_java/
client@client-Workstation:~/workspace/gameoflife_java$ curl -o .git/hooks/commit-msg http://192.168.1.100:8081/tools/hooks/commit-msg
  % Total    % Received % Xferd  Average Speed   Time    Time     Time  Current
                                 Dload  Upload   Total   Spent    Left  Speed
100  4276  100  4276    0     0   3515      0  0:00:01  0:00:01 --:--:--  4341
client@client-Workstation:~/tmp/gameoflife_java$ chmod u+x .git/hooks/commit-msg
client@client-Workstation:~/tmp/gameoflife_java$
Configure the git user properties:
client@client-Workstation:~/workspace/gameoflife_java$ git config remote.origin.push HEAD:refs/for/master
client@client-Workstation:~/workspace/gameoflife_java$ git config user.name erizhang
client@client-Workstation:~/workspace/gameoflife_java$ git config user.email eric.zhang@xxx.com
client@client-Workstation:~/workspace/gameoflife_java$
Okay, from here, you can execute general git command to commit and push your source code changes.
client@client-Workstation:~/workspace/gameoflife_java$ vim README.md
client@client-Workstation:~/workspace/gameoflife_java$ git status
# On branch master
#
# Initial commit
#
# Untracked files:
#   (use "git add ..." to include in what will be committed)
#
#   README.md
nothing added to commit but untracked files present (use "git add" to track)
client@client-Workstation:~/workspace/gameoflife_java$ git add .
client@client-Workstation:~/workspace/gameoflife_java$ git commit -m 'add README.md to initialize this repository'
[master (root-commit) 585f136] add README.md to initialize this repository
 1 file changed, 18 insertions(+)
 create mode 100644 README.md
Execute above command, we have already commit the source code changes in local git repository, and then we have to push them to our gerrit server git repository:
client@client-Workstation-Workstation:~/workspace/gameoflife_java$ git push origin
Username for 'http://192.168.1.100:8081': erizhang
Password for 'http://erizhang@192.168.1.100:8081':
remote: Processing changes: new: 1, refs: 1, done
remote:
remote: New Changes:
remote:   http://192.168.1.100:8081/1
remote:
To http://192.168.1.100:8081/gameoflife_java
 * [new branch]      HEAD -> refs/for/master
client@client-Workstation-Workstation:~/workspace/gameoflife_java$
Please notice that there is remote: http://192.168.1.100:8081/1, for this change, there is change-id generated, and developer can distribute this URL to reviewer for source code review. Let’s open this link with our web browser:
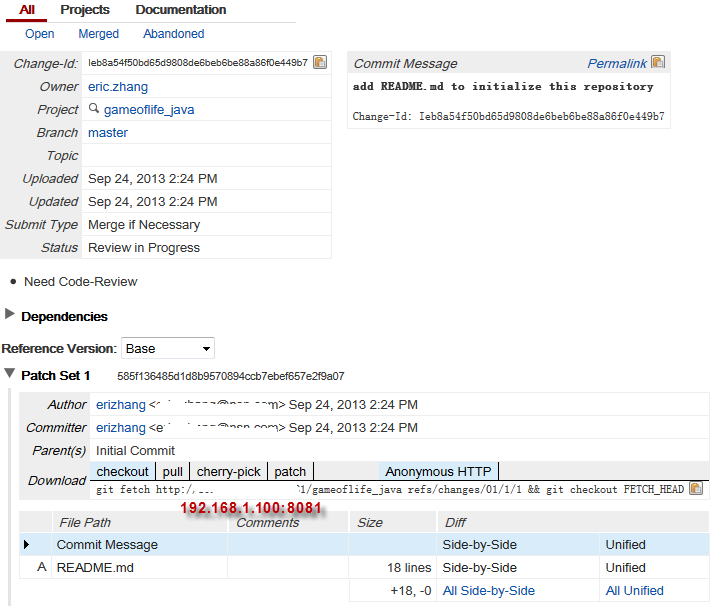
Okay, reviewer or project owner can review this source code changes, approve the change and submit the change to master. Based on current basic configuration, only project owner and gerrit administrator have permission to approve the changes and submit the changes. In reality, the project process is not easy like that, we decide to nominate a group of people to take the key reviewer role of our project, only key reviewer can approve the final review.
2.5. Create ReviewBoard group and access control
Create ReviewBoard group and add the members
Login gerrit web UI with administrator, select “People” -> “Create New Group”
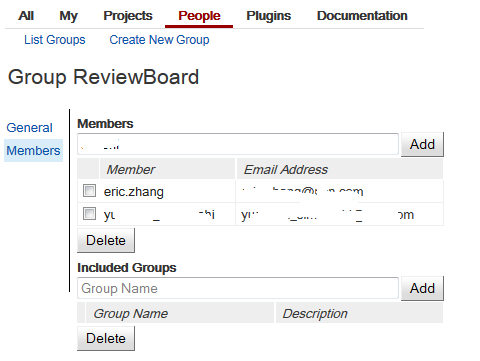
Access control of the new create group
Select our created project, there is “Access”, click and edit it. “Add reference” for refs/heads/* and refs/meta/config separately, see below diagram illustrate:
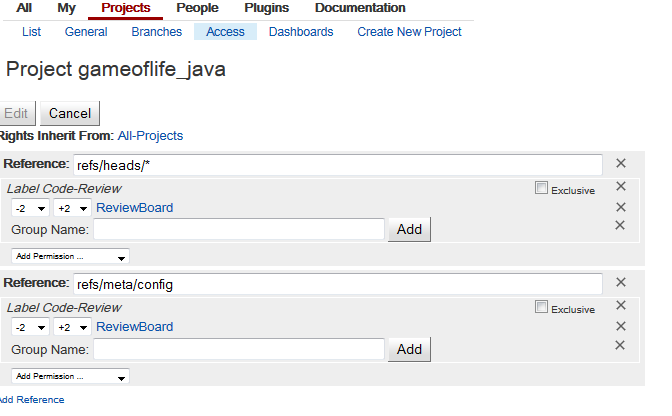
Till now, we have create new Group named “ReviewBoard”, and all members in this group have “Label Review” access control, in another words, they can approve the source code review. More information about access control, you can refer the gerrit official document Access Control section.
3. Jenkins deployment
3.1. Install Jenkins
jenkins@jenkins-Workstation:~/gerrit/jenkins$ wget -q -O - http://pkg.jenkins-ci.org/debian/jenkins-ci.org.key | sudo apt-key add -
jenkins@jenkins-Workstation:~/gerrit/jenkins$ sudo sh -c 'echo deb http://pkg.jenkins-ci.org/debian binary/ > /etc/apt/sources.list.d/jenkins.list'
jenkins@jenkins-Workstation:~/gerrit/jenkins$ sudo apt-get update
jenkins@jenkins-Workstation:~/gerrit/jenkins$ sudo apt-get install jenkins
3.2. Start jenkins
If you want to start jenkins with another port rather than default port 8080,you can modify below configuration file, and set the httpPort to your prefer:
jenkins@jenkins-Workstation:~$ sudo vim /etc/default/jenkins
Start jenkins:
jenkins@jenkins-Workstation:~$ sudo /etc/init.d/jenkins start
 * Starting Jenkins Continuous Integration Server jenkins                                                   [ OK ]
jenkins@jenkins-Workstation:~$
4. Gerrit Trigger
4.1. Install the Gerrit Trigger Plugin
Open your browser, and type the jenkins address, here we use http://192.168.1.200:8080, in the dashboard, choose “Manage Jenkins” -> “Manage Plugin”, and then you can find the Gerrit Trigger in the “Available” tab.
NOTE: If there is empty in the “Available” tab, maybe you should select “Advanced” tab, and click “Check Now” which locates the right-bottom of the page. Of cause, if you encounter the problem of connect internet, perhaps you have to configure the proxy under “Advanced” tab as well.
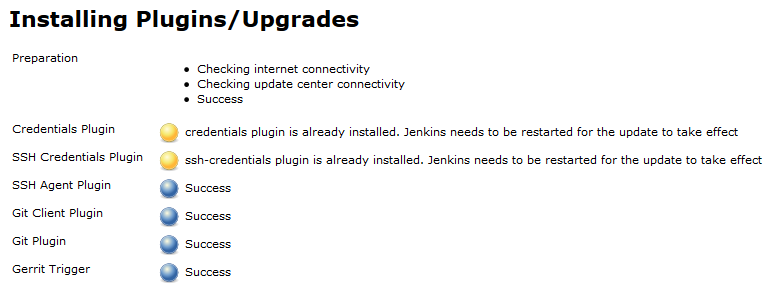
Select the plugin, and install without restart, the process which shows like this.
4.2. Generate jenkins needs ssh-key for Gerrit Trigger usage
Since jenkins will operate gerrit via SSH protocol, to Gerrit, there will be a gerrit user account represents jenkins. So, this step is generate rsa key first.
jenkins@jenkins-Workstation:/var/lib/jenkins$ sudo ssh-keygen                                   -t rsa -C "jenkins@xxx.com"
Generating public/private rsa key pair.
Enter file in which to save the key (/root/.ssh/id_rsa): /var/lib/jenkins/.ssh/i                                  d_rsa
Enter passphrase (empty for no passphrase):
Enter same passphrase again:
Your identification has been saved in /var/lib/jenkins/.ssh/id_rsa.
Your public key has been saved in /var/lib/jenkins/.ssh/id_rsa.pub.
The key fingerprint is:
8d:e6:0c:42:cf:3b:d6:52:63:e8:a0:d7:9a:7b:5f:bd jenkins@xxx.com
The key's randomart image is:
+--[ RSA 2048]----+
|                 |
|                 |
|    .            |
|   . o . o       |
|    o = S .      |
|   . = X . .     |
|  . . B + . .    |
|   . +.o .   .   |
|    +o ..   E    |
+-----------------+
4.3. Create jenkins user account for jenkins
In jenkins server, generate the jenkins rsa public key by this command:
Create a new gerrit user jenkins
jenkins@jenkins-Workstation:~/gerrit/review_site/bin$ ssh -p 29418 erizhang@192.168.1.100 gerrit create-account --ssh-key - jenkins < /var/lib/jenkins/.ssh/id_rsa.pub
Enter passphrase for key '/home/erizhang/.ssh/id_rsa':
jenkins@jenkins-Workstation:~/gerrit/review_site/bin$
Now we have create a new gerrit account jenkins, this account will be used for the gerrit automatically trigger jenkins job purpose. Of cause, you can use gerrit set-account command to change the or add the account properties.
4.4. Configure Gerrit Trigger
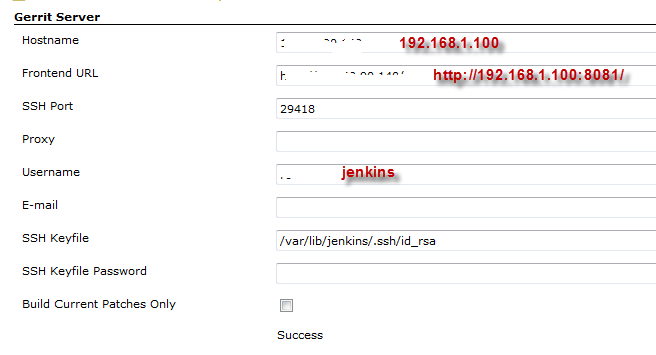
Select “Manage Jenkins” –> “Gerrit Trigger”, you can enter into the Gerrit Trigger pages. Fill your Gerrit server host address, user name which represents jenkins to access gerrit, ssh keys etc., and click “Test Connection”. It will show success or not. See below diagram shows.
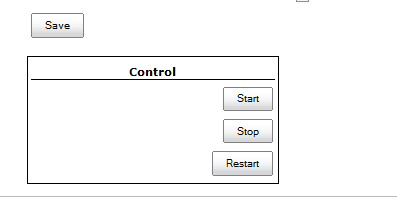
After then, save your settings and restart the connection in the “Control” section at the bottom of the page:
4.5. Add Label Verified Access Control to jenkins account
Firstly, please make sure, there is Label Verified of the project access control, by default, gerrit does not have this access control. You can refer the post How to edit the project.config for all projects in Gerrit to implement it. Here we add the “Label Verified” access control, and then any projects which inherited form All-Projects will have this access control label.
client@client-Workstation:~/tmp/a$ git init
Initialized empty Git repository in /home/erizhang/tmp/a/.git/
client@client-Workstation:~/tmp/a$ git remote add origin ssh://erizhang@192.168.1.100:29418/All-Projects
client@client-Workstation:~/tmp/a$ git fetch origin refs/meta/config:refs/remotes/origin/meta/config
remote: Counting objects: 4, done
remote: Finding sources: 100% (4/4)
remote: Total 4 (delta 0), reused 0 (delta 0)
Unpacking objects: 100% (4/4), done.
From ssh://192.168.1.100:29418/All-Projects
 * [new branch]      refs/meta/config -> origin/meta/config
client@client-Workstation:~/tmp/a$ ls
client@client-Workstation:~/tmp/a$ git config user.email eric.zhang@xxx.com
client@client-Workstation:~/tmp/a$ git config user.name erizhang
client@client-Workstation:~/tmp/a$ ls
client@client-Workstation:~/tmp/a$ git co meta/config
Branch meta/config set up to track remote branch meta/config from origin.
Switched to a new branch 'meta/config'
client@client-Workstation:~/tmp/a$ ls
groups  project.config
Open project.config, and append below lines into the file.
[label "Verified"]
       function = MaxWithBlock
       value = -1 Fails
       value =  0 No score
       value = +1 Verified
Execute below commands, to update the configuration.
client@client-Workstation:~/tmp/a$ git commit -a -m 'add verified label'
[meta/config 09b3910] add verified label
 1 file changed, 6 insertions(+)
client@client-Workstation:~/tmp/a$ git push origin meta/config:meta/config
Counting objects: 5, done.
Delta compression using up to 2 threads.
Compressing objects: 100% (3/3), done.
Writing objects: 100% (3/3), 395 bytes, done.
Total 3 (delta 1), reused 0 (delta 0)
remote: Resolving deltas: 100% (1/1)
remote: Processing changes: refs: 2, done
To ssh://erizhang@192.168.1.100:29418/All-Projects
   7fa7742..09b3910  meta/config -> refs/meta/config
client@client-Workstation:~/tmp/a$
4.6. Create VerifyBoard Group and add jenkins user account in this group
Can follow section 2.5 to implement it.
4.7. Create the jenkins job
If you have already finished above steps, now you can follow the Gerrit Trigger official guideline to create the jenkins job. I’m not going to repeat it in this post again.
Further reading
Gerrit Code Review - A Quick Introduction
– EOF –


 Figure 1-1


